Follow the instructions below to make use of ClickOnce installation
Prerequisites:
All client machines where the Visual Production Scheduler shall be installed via ClickOnce need to have the .NET Framework 2.0 and Visual C++ Runtimes installed. The necessary setups for the Visual C++ Runtimes can be downloaded here:
http://web.netronic.de/Downloads/common/vcredist_vs2005sp1_x64.zip
http://web.netronic.de/Downloads/common/vcredist_vs2005sp1_x86.zip
This needs to be done only once initially, you can then update the add-ins of the Visual Scheduling Suite via ClickOnce.
Preparation of the VPS for ClickOnce:
Install at least the client part of the Visual Production Scheduler on the machine where you want to set up the ClickOnce download environment. If that machine is also running the NAV Service or Services please install all components. To do so, use the relevant complete setup file (not the client-only setup).1. To prepare the VPS for ClickOnce, you need to move these two dlls:
- NETRONIC.DNAV.VSSuite.BarLabel.DataBuilder.dll
- NETRONIC.DNAV.VSSuite.Tooltip.DataBuilder.dll
These two files are each located in up to 5 different subfolders of the Role Tailored Client. Both can be found in the Add-ins\NETRONIC\Visual * Scheduler folders and additionally
- NETRONIC.DNAV.VSSuite.BarLabel.DataBuilder.dll in the BarLabel Editor folder
- NETRONIC.DNAV.VSSuite.Tooltip.DataBuilder.dll in the Tooltip Editor folder
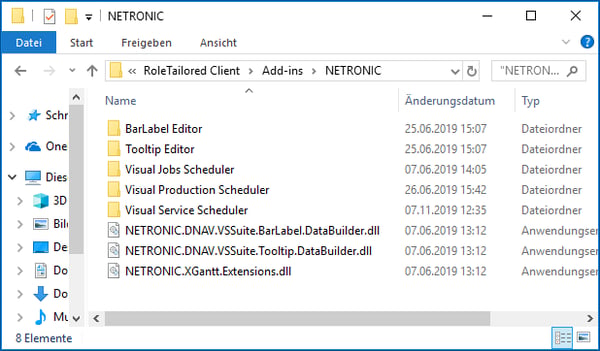
NETRONIC folder.
3. Remove them from all other folders so that they can only be found in the NETRONIC folder.
4. Move the file NETRONIC.XGantt.Extensions.dll one level upwards into the NETRONIC folder and delete it in all other folders of the RTC.
Now, the NETRONIC folder should look like shown below.
To copy these dlls, proceed as follows:
In order to open the GAC, run (Windows + r) one of following commands:- For the x64 DLL: %windir%\assembly\GAC_64
- For the x86 DLL: %windir%\assembly\GAC_32
Please choose the same version as the Dynamics.Nav.Client.exe which you want to deploy!
6. Do the same for NETRONIC.XTree and copy the NETRONIC.XTree.dll into the RTC folder as well.
7. Additionally copy the dlls from the steps 2 and 3 into your ClickOnce folder.
Creating the ClickOnce Package:
Refresh the ClickOnce manifest and the application file. It could be that you have to start from the template files again because the manifest file does not recognize dlls which have been removed.
Note:
- If you see a message that the file Add-ins/NETRONIC/Visual Production Scheduler/NETRONIC VPS for <NAV Version>.fob could not be downloaded, remove it out of the RTC folder and out of the ClickOnce manifest. Then create the application and manifest files again (See above).
- In case the above instructions do not work, please proceed as follows:
Move all dlls, i.e.
- NETRONIC.DNAV.VSSuite.BarLabel.DataBuilder.dll
- NETRONIC.DNAV.VSSuite.Tooltip.DataBuilder.dll
- NETRONIC.XGantt.Extensions.dll
- NETRONIC.XGantt.dll
- NETRONIC.XTree.dll
to the RTC folder and delete them in all other folders. Then create the application and manifest files again (See above).