First, you as a partner need to become "VAPS certified". Please contact sales@netronic.com to find out details about the certification process.
Once you are VAPS certified, you'll get access to our "NETRONIC VAPS Partner Community". It is based on Microsoft Teams, and your place to go to get your demo version/ runtime package of the product as well as Marketing and Sales collateral.
Prerequisites to install the VAPS:
-
An up-and-running full-fledged Dynamics 365 Business Central Installation
-
Minimum required version: Business Central v21
-
Access to the backend via the “Business Central Administration Shell” or the “NAV Container Helper”
-
The Web Client needs to be enabled – and using the Web Client is highly recommended
-
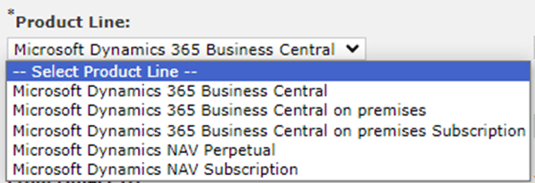
Assign the module „5415960 Visual Advanced Production Scheduler” to the license and activate the license in Microsoft Dynamics 365 Business Central:
-
Select the according Product Line
The Product Lines supported by the VAPS are
-
Microsoft Dynamics 365 Business Central
-
Microsoft Dynamics 365 Business Central on premises
-
Microsoft Dynamics 365 Business Central on premises subscription
-
-
The VAPS D365 on-prem can be installed in two different ways:
1. THE NAVSERVER INSTANCE IS INSTALLED DIRECTLY ON THE COMPUTER
What is needed for the installation:
-
Admin access to the NAV/BC server computer
-
Access to the NAV/BC Admin Shell & Development Shell with admin rights on this computer
-
The “Name” of the NAV/BC ServerInstance into which the extension should be installed
-
An updated NAV/BC license installed, which has the extension objects included
-
Access to the NAV/BC Web Client to test the installation
-
Access as “SUPER” user to NAV/BC, to assign Permission Sets to other users
Initial installation instructions:
-
Run the "Business Central Administration Shell" as administrator and enter the following commands:
Publish-NAVApp -ServerInstance NAV
-Path “NETRONIC Software GmbH_Visual Advanced Production Scheduler_1.x.y.z_runtime.app”
-SkipVerification

Sync-NAVApp -ServerInstance NAV -Name “Visual Advanced Production Scheduler”

Install-NAVApp -ServerInstance NAV -Name “Visual Advanced Production Scheduler”
- If the install call gives an error regarding “DataUpgrade”, try
Start-NAVAppDataUpgrade -ServerInstance NAV
-Name “Visual Advanced Production Scheduler”
Update/upgrade instructions:
- Run the “Business Central Administration Shell” as administrator and enter the following commands:
- First Uninstall & Unpublish of the previous version of the VAPS by
Uninstall-NAVApp -ServerInstance NAV -Name "Visual Advanced Production Scheduler"

Unpublish-NAVApp -ServerInstance NAV -Name "Visual Advanced Production Scheduler"
-
Now follow the steps from the initial installation
Publish-NAVApp -ServerInstance NAV -Path “NETRONIC Software GmbH_Visual Advanced Production

Scheduler_1.x.y.z_runtime.app” -SkipVerification

Sync-NAVApp -ServerInstance NAV -Name “Visual Advanced Production Scheduler”

Install-NAVApp -ServerInstance NAV -Name “Visual Advanced Production Scheduler”
- If the install call gives an error regarding “DataUpgrade”, try
Start-NAVAppDataUpgrade -ServerInstance NAV -Name “Visual Advanced Production Scheduler”
Final steps
- Open the NAV/BC Web Client as user with “SUPER” permissions
- Check the “extension management” page if the extension got installed properly
- Check if you can open/run the extension
- Assign the “NETRONIC VAPS” permission set to all users which should work with the extension.
Known solution for issues occurring after upgrading to a newer Business Central version:
- Use the following where the extension was already installed in the older BC version:
Sync-NAVApp -ServerInstance NAV
-Name "Visual Advanced Production Scheduler" -Version "1.1.0.0" -Mode ForceSync
2. THE NAVSERVER INSTANCE IS RUNNING FROM A DOCKER ENVIRONMENT
What is needed for the installation:
-
Admin access to server computer and the corresponding Docker environment
-
Access to a powershell with the NAVContainerHelper module installed
-
The “Name” of the NAV/BC Container into which the extension should be installed
-
An updated NAV/BC license installed, which has the VAPS objects included
-
Access to the NAV/BC Web Client to test the installation
-
Access as “SUPER” user to NAV/BC, to assign Permission Sets to other users
Initital installation Instructions:
- Please enter the following command with the help of the "NAV Container Helper"
Publish-NavContainerApp -containerName navserver
-appFile “NETRONIC Software GmbH_Visual Advanced Production Scheduler_1.x.y.z_runtime.app”
 -skipVerification -sync -install
- If the publish call gives an error regarding “DataUpgrade”, try
Start-NAVContainerAppDataUpgrade -containerName navserver
-Name “Visual Advanced Production Scheduler”
Update/upgrade instructions:
Please enter the following command with the help of the “NAV Container Helper”
- First Uninstall & Unpublish of the previous version of the VAPS by
UnPublish-NavContainerApp -containerName navserver -unInstall
-appName "Visual Advanced Production Scheduler"
- Now follow the steps from the initial installation
Publish-NavContainerApp -containerName navserver
-appFile “NETRONIC Software GmbH_Visual Advanced
Production Scheduler_1.x.y.z_runtime.app” -skipVerification -sync -install
- If the publish call gives an error regarding “DataUpgrade”, try
Start-NAVContainerAppDataUpgrade -containerName navserver
-Name “Visual Advanced Production Scheduler”
Final steps
- Open the NAV/BC Web Client as user with “SUPER” permissions
- Check the “extension management” page if the extension got installed properly
- Check if you can open/run the extension
- Assign the “NETRONIC VAPS” permission set to all users which should work with the extension.
Known solution for issues occurring after upgrading to a newer Business Central version:
- Use the following where the extension was already installed in the older BC version:
Publish-NavContainerApp -containerName navserver
–appFile "C:\Users\vmAdmin\Desktop\1.1.0.0\NETRONIC Software GmbH_Visual
Advanced Production Scheduler_1.1.0.0.app" -skipVerification -sync -syncMode ForceSync
Or
Sync-NavContainerApp -containerName navserver
-appName “Visual Advanced Production Scheduler -Mode ForceSync